
How to Create Depth in Your Drawings
Shading is the secret ingredient that turns flat sketches into lifelike art. It’s what gives your drawings volume, form, and realism. Whether you’re sketching a still life, a portrait, or a fantasy creature, mastering shading is essential. This beginner-friendly guide will walk you through the core concepts and techniques to bring depth to your work—one smooth stroke at a time.
What Is Shading in Drawing?
Shading is the use of light and shadow to suggest three-dimensional form. When done right, it tricks the eye into seeing curves, contours, and textures—even though you’re working on a flat surface.
Materials You’ll Need
- Graphite pencils (2H, HB, 2B, 4B, 6B)
- Eraser (kneaded or precision)
- Blending stump or tissue
- Sketchbook or drawing paper
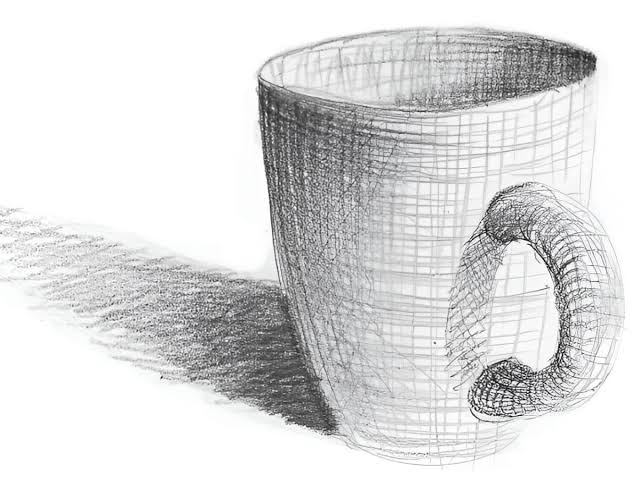
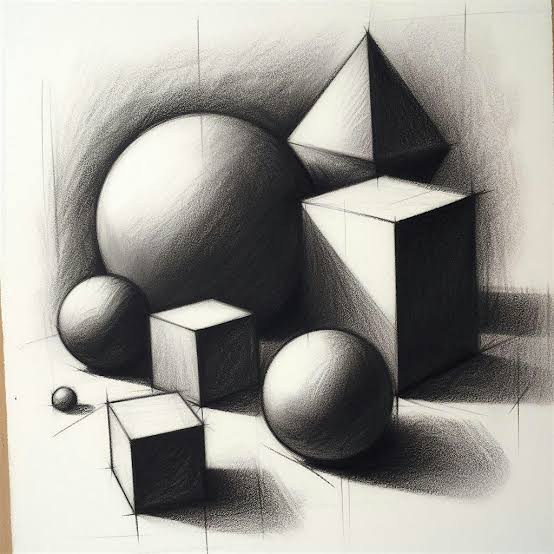
Understanding Light and Shadow
Before you start shading, learn how light works:
- Light Source: The direction from which the light hits your subject.
- Highlight: The brightest area where light hits directly.
- Midtones: The natural shade between light and dark.
- Core Shadow: The darkest area, away from the light.
- Cast Shadow: The shadow the object throws onto a surface.

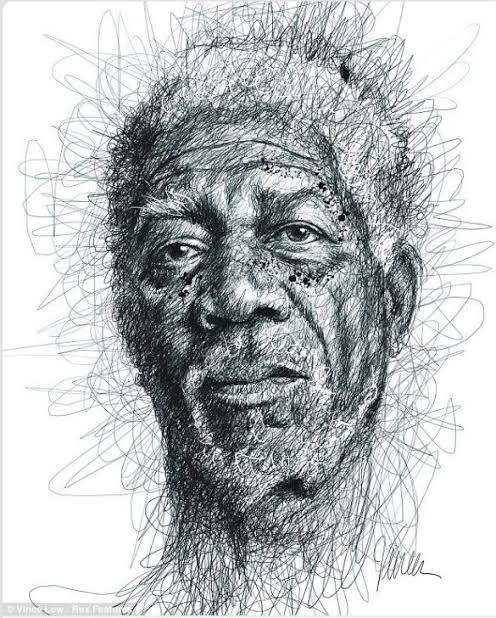
Shading Techniques to Practice
1. Hatching
Draw a series of parallel lines close together. The closer they are, the darker the shade. Great for quick sketches.
2. Cross-Hatching
Layer crisscrossed lines to build richer tones. This technique offers more control over shading intensity.
3. Blending
Use your finger, a blending stump, or tissue to smooth out pencil strokes for soft, realistic shadows.
4. Stippling
Create depth with small dots. The denser the dots, the darker the tone. Time-consuming, but great for texture.
5. Scumbling
Use tiny, circular motions with your pencil. This gives a textured, layered look—perfect for fabric or skin tones.

Step-by-Step Shading Practice
- Draw a simple shape—a sphere, cube, or cylinder.
- Choose a light source direction (top left is common for practice).
- Apply shading techniques to show light to dark areas.
- Blend or layer where necessary to smooth transitions.
- Add cast shadows to anchor the object to the surface.
Tips for Better Shading
- Don’t press too hard—build layers gradually.
- Rotate your pencil to keep the tip fresh.
- Step back often to see your work as a whole.
- Use reference photos to study real-life lighting.
Ready to Share Your Shaded Sketches?
Join the Global Art Forms hub to showcase your pencil drawings and connect with artists around the world.
Submit your best works through our Portfolio Submission Form and be featured among emerging talents.
Looking to sharpen your skills further? Explore our recommended resources on the Art Books page.
