
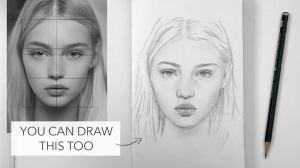
Master the art of portrait drawing by learning essential techniques to achieve realistic proportions, shading, and expressions.

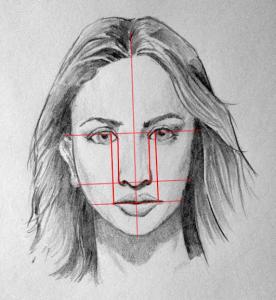
1. Start with Basic Face Proportions
Begin by sketching a simple oval or egg shape, which will serve as the foundation of the head. Lightly divide the face into sections: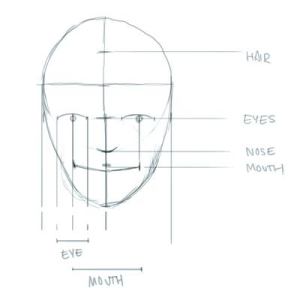
- Draw a vertical line down the center for symmetry.
- Add a horizontal line across the middle for eye placement.
- Place the nose at the halfway point between the eyes and chin.
- The mouth typically aligns a third of the way down from the nose to the chin.
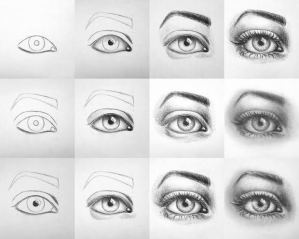
2. Sketch the Eyes
The eyes are the focal point of any portrait. Follow these steps for accurate placement: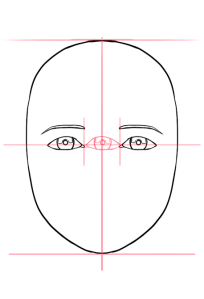
- The width of one eye should be equal to the space between both eyes.
- Add eyelids, pupils, and reflections to make the eyes look more natural.
- Use light shading around the eyes to create depth.
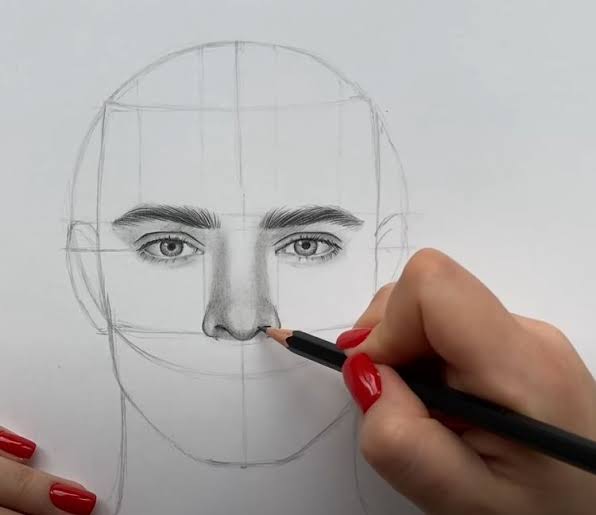
3. Shape the Nose and Lips
Use soft lines to construct the nose: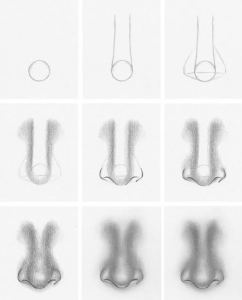
- The nostrils align with the inner corners of the eyes.
- Shade gently to define the bridge and sides of the nose.
For the lips: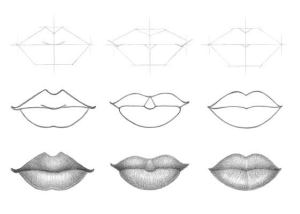
- The width of the mouth usually aligns with the pupils.
- Use soft curves for a natural lip shape, avoiding harsh outlines.
- Shading helps create fullness and realism. Shading Techniques
4. Define the Jawline and Ears
The shape of the jawline depends on the character’s features. Keep these points in mind: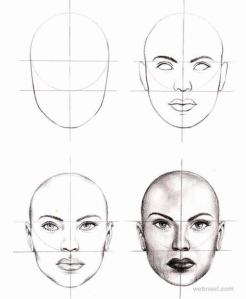
- The ears should align with the eye and nose level.
- Jawlines vary based on gender and facial structure—study references for accuracy.
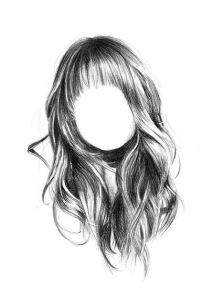
5. Add Hair and Fine Details
Drawing hair requires understanding its flow and volume: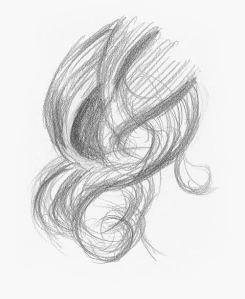
- Sketch the general shape before adding individual strands.
- Use varied pencil strokes to create texture and depth.
- Leave some areas lighter to represent highlights.
6. Master Shading for a Realistic Look
Shading brings the face to life by adding dimension: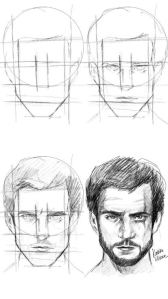
- Identify the light source to create proper shadows.
- Use blending tools like tissue or a blending stump for smooth transitions.
- Focus on shadowing under the eyes, nose, and chin to enhance realism.
7. Final Touches and Refinements
Step back and assess your drawing:
- Adjust any proportions that seem off.
- Deepen shading in key areas for better contrast.
- Use an eraser to create highlights on the nose, lips, and forehead.
Practice Makes Perfect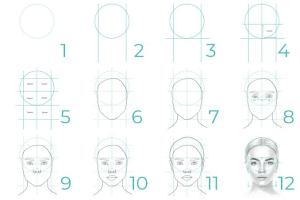
Realistic face drawing takes time and patience. The more you practice, the more confident you’ll become in capturing facial features and emotions.
Affiliate Disclosure: This content contains affiliate links from trusted partners, connecting you with quality products and creative resources. I may earn a commission if you make a purchase, at no additional cost to you. This helps support my platform and its content.

Wonderful ♥️
LikeLike